
The Ultimate 7-Day Pre-Op MRSA Screening Checklist and Surgery Guide
What if the success of your upcoming surgery depends less on the surgeon’s skill and more on the hygiene steps you take at home seven days before the procedure? It’s a natural concern; you’ve likely spent weeks worrying about potential delays or the risk of hospital-acquired infections. The fear of a last-minute cancellation due to an undetected colonisation is common, but it’s also manageable with the right preparation. Using a professional pre-op MRSA screening checklist ensures you don’t leave your safety to chance during this critical window.
This article provides a comprehensive, day-by-day roadmap to help you secure your health and prepare your home for a smooth recovery. Our goal is to replace pre-surgery anxiety with the quiet confidence that comes from being fully prepared. We’ll outline precisely when to begin decolonisation protocols, how to manage medication stop-dates, and which screening steps are vital for your peace of mind. By following this structured guide, you can ensure your home environment and your health are ready for a successful operation and a safe return to fitness.
This comprehensive guide provides a structured roadmap for the final week before your operation, focusing on clinical safety and logistical efficiency. By the end of this article, you’ll understand how to manage the following critical areas:
- Strategic Countdown: Recognise why the seven-day mark serves as the definitive point for confirming hospital logistics, including ward locations and specific arrival times.
- Biological Readiness: Gain clarity on managing medications such as aspirin or ibuprofen, ensuring you follow your surgeon’s guidance to prepare your body for a safe procedure.
- Infection Screening: Utilise a professional pre-op MRSA screening checklist to identify antibiotic-resistant bacteria, a vital step in preventing avoidable surgical delays or cancellations.
- Clinical Hygiene Standards: Master the step-by-step protocol for using antimicrobial washes like Chlorhexidine (CHG), moving beyond standard cleanliness to meet strict clinical requirements.
- Home and Hospital Logistics: Finalise your recovery environment and pack essential items, such as admission letters and medication lists, to ensure a well-managed transition from hospital to home.
Following these expert-led steps helps replace pre-surgery anxiety with the quiet confidence that you’re fully prepared for a successful outcome and a smooth recovery.
The 7-Day Surgery Countdown: Essential Logistics and Health Checks
The seven days leading up to your operation represent a critical transition. This is the point where logistical planning must become active preparation. It’s the ideal time to review your preparing for surgery checklist to ensure no early-stage tasks, such as arranging time off work or childcare, have been overlooked. At this one-week mark, your focus shifts toward creating a sterile and supportive environment for your recovery. It’s about ensuring that both your body and your home are ready for the procedure.
During this window, you should contact the hospital to confirm your exact arrival time and the specific ward location. Hospital schedules are complex and can change; a quick phone call provides peace of mind and prevents confusion on the morning of your admission. You also need to verify your support network. Most hospitals require a responsible adult to drive you home and stay with you for at least the first 24 hours post-surgery. Confirming these arrangements now ensures you meet the safety criteria for discharge.
Confirming Your Pre-Op Assessment Results
Your initial pre-op assessment involves various swabs and blood tests to ensure you’re fit for anaesthesia. One of the most important checks is for Methicillin-resistant Staphylococcus aureus (MRSA). If you haven’t heard back regarding your results, contact the pre-assessment clinic. Using a pre-op MRSA screening checklist helps you keep track of these clinical milestones. If a swab returns a positive result, you’ll need to start a decolonisation protocol immediately to avoid surgery delays. Additionally, report any new symptoms like a cough, cold, or skin sores to your surgical team. Even minor infections can sometimes lead to a postponement for your own safety.
Finalising Travel and Post-Discharge Support
Don’t leave your travel arrangements to the last minute. Book transport that accounts for potential discharge delays, as waiting for final observations or hospital pharmacy prescriptions can take longer than expected. Your designated carer should be briefed on their role for the first night, including monitoring your pain levels and helping with mobility. It’s also wise to confirm the opening hours of your local pharmacy. Having a clear plan for picking up post-op medications ensures you can focus entirely on resting once you return home. Maintaining a pre-op MRSA screening checklist throughout this week ensures that every logistical detail is managed with professional efficiency.
Biological Preparation: Managing Medications and Dietary Restrictions
The final week before surgery is a period of biological preparation. While your surgical team handles the technical aspects of the procedure, you’re responsible for ensuring your body is in the best possible state for recovery. Following your surgeon’s medication plan exactly is non-negotiable. Many common over-the-counter drugs can interfere with blood clotting or interact with anaesthesia. For instance, medications like aspirin or ibuprofen are typically phased out seven days before surgery to reduce the risk of excessive bleeding. This biological lockdown ensures that your internal chemistry is stable before you enter the operating theatre.
Integrating a pre-op MRSA screening checklist into your routine helps ensure that while you’re managing your internal health, you’re also addressing external infection risks. This dual approach is supported by the Clinical Review of MRSA Screening, which highlights how proactive measures significantly improve patient outcomes. If you’re currently managing multiple health priorities, you can order a private MRSA test to gain clarity on your status without leaving your home.
Medication Adjustments and Supplements
Creating a detailed medication log for the final week is a simple yet effective way to avoid dangerous omissions. You must disclose all herbal supplements to your anaesthetist. Common items like garlic, ginseng, and St. John’s Wort might seem harmless, but they can significantly increase bleeding risks or affect blood pressure during an operation. If you’ve started a new prescription or have questions about your current regimen, contact the hospital’s anaesthetic department immediately. They provide specific instructions tailored to your medical history, ensuring your safety during the procedure.
Pre-Op Diet and Hydration Strategy
Your nutritional intake during the final seven days acts as fuel for your recovery. Many UK hospitals now recommend a “Carbohydrate Loading” strategy. This involves consuming specific high-carbohydrate drinks provided by the clinic to help your body maintain energy levels during the fasting period. Hydration is equally critical. Aim for clear urine in the days leading up to your procedure by drinking plenty of water. As you approach the 48-hour mark, transition to light, easily digestible meals. This shift helps prepare your digestive system for the effects of anaesthesia and reduces post-operative discomfort. By sticking to these biological guidelines and following your pre-op MRSA screening checklist, you’re actively contributing to a safer surgical experience.
Minimising Infection Risk: The Critical Role of MRSA Screening
MRSA screening is a specialised diagnostic process designed to identify the presence of Methicillin-resistant Staphylococcus aureus on your skin or in your nostrils. While these bacteria often live harmlessly on healthy individuals, they pose a significant threat during surgery. If these resistant bacteria enter a surgical incision, they can cause deep-tissue infections that are difficult to treat with standard antibiotics. Because of this risk, an MRSA-positive result often leads to the immediate cancellation or delay of elective procedures. Hospitals prioritise your safety, and they won’t proceed if there’s a high chance of a preventable complication.
One often overlooked factor is the “Infection Gap.” Most patients attend a hospital pre-op assessment two to four weeks before their actual surgery date. In the intervening weeks, you continue your daily life, using public transport, visiting shops, or attending gyms. It’s entirely possible to become colonised with MRSA during this period, even if your initial hospital swab was clear. Understanding how hospital acquired infections complicate recovery is essential for any patient. A professional pre-op MRSA screening checklist should account for this window of risk to ensure you’re truly clear on the day of admission.
Why Hospitals Prioritise MRSA Screening
Hospitals operate under strict protocols to protect all patients on a ward. If one patient carries MRSA, there’s a risk of transmission to other vulnerable individuals, including those with weakened immune systems. If you test positive, you’ll typically undergo a five-day decolonisation protocol. This involves using a specific nasal ointment and antimicrobial body wash to eliminate the bacteria from your skin. Completing this process before you arrive at the hospital is the most effective way to ensure your surgery goes ahead as planned.
The 7-Day Window: Why a Private PCR Test Makes Sense
Timing is everything in the final week. Standard laboratory cultures usually take between three and five days to provide a definitive result. If you’re seven days away from surgery, waiting for a culture might leave you with very little time to act if the result is positive. A PCR test is different; it detects the genetic material of the bacteria directly, providing results much faster. This speed is vital for your pre-op MRSA screening checklist. You can order a fast, accurate MRSA test to confirm your status from the comfort of your home. This proactive step provides the peace of mind that your “infection gap” is closed and you’re ready for a successful operation.
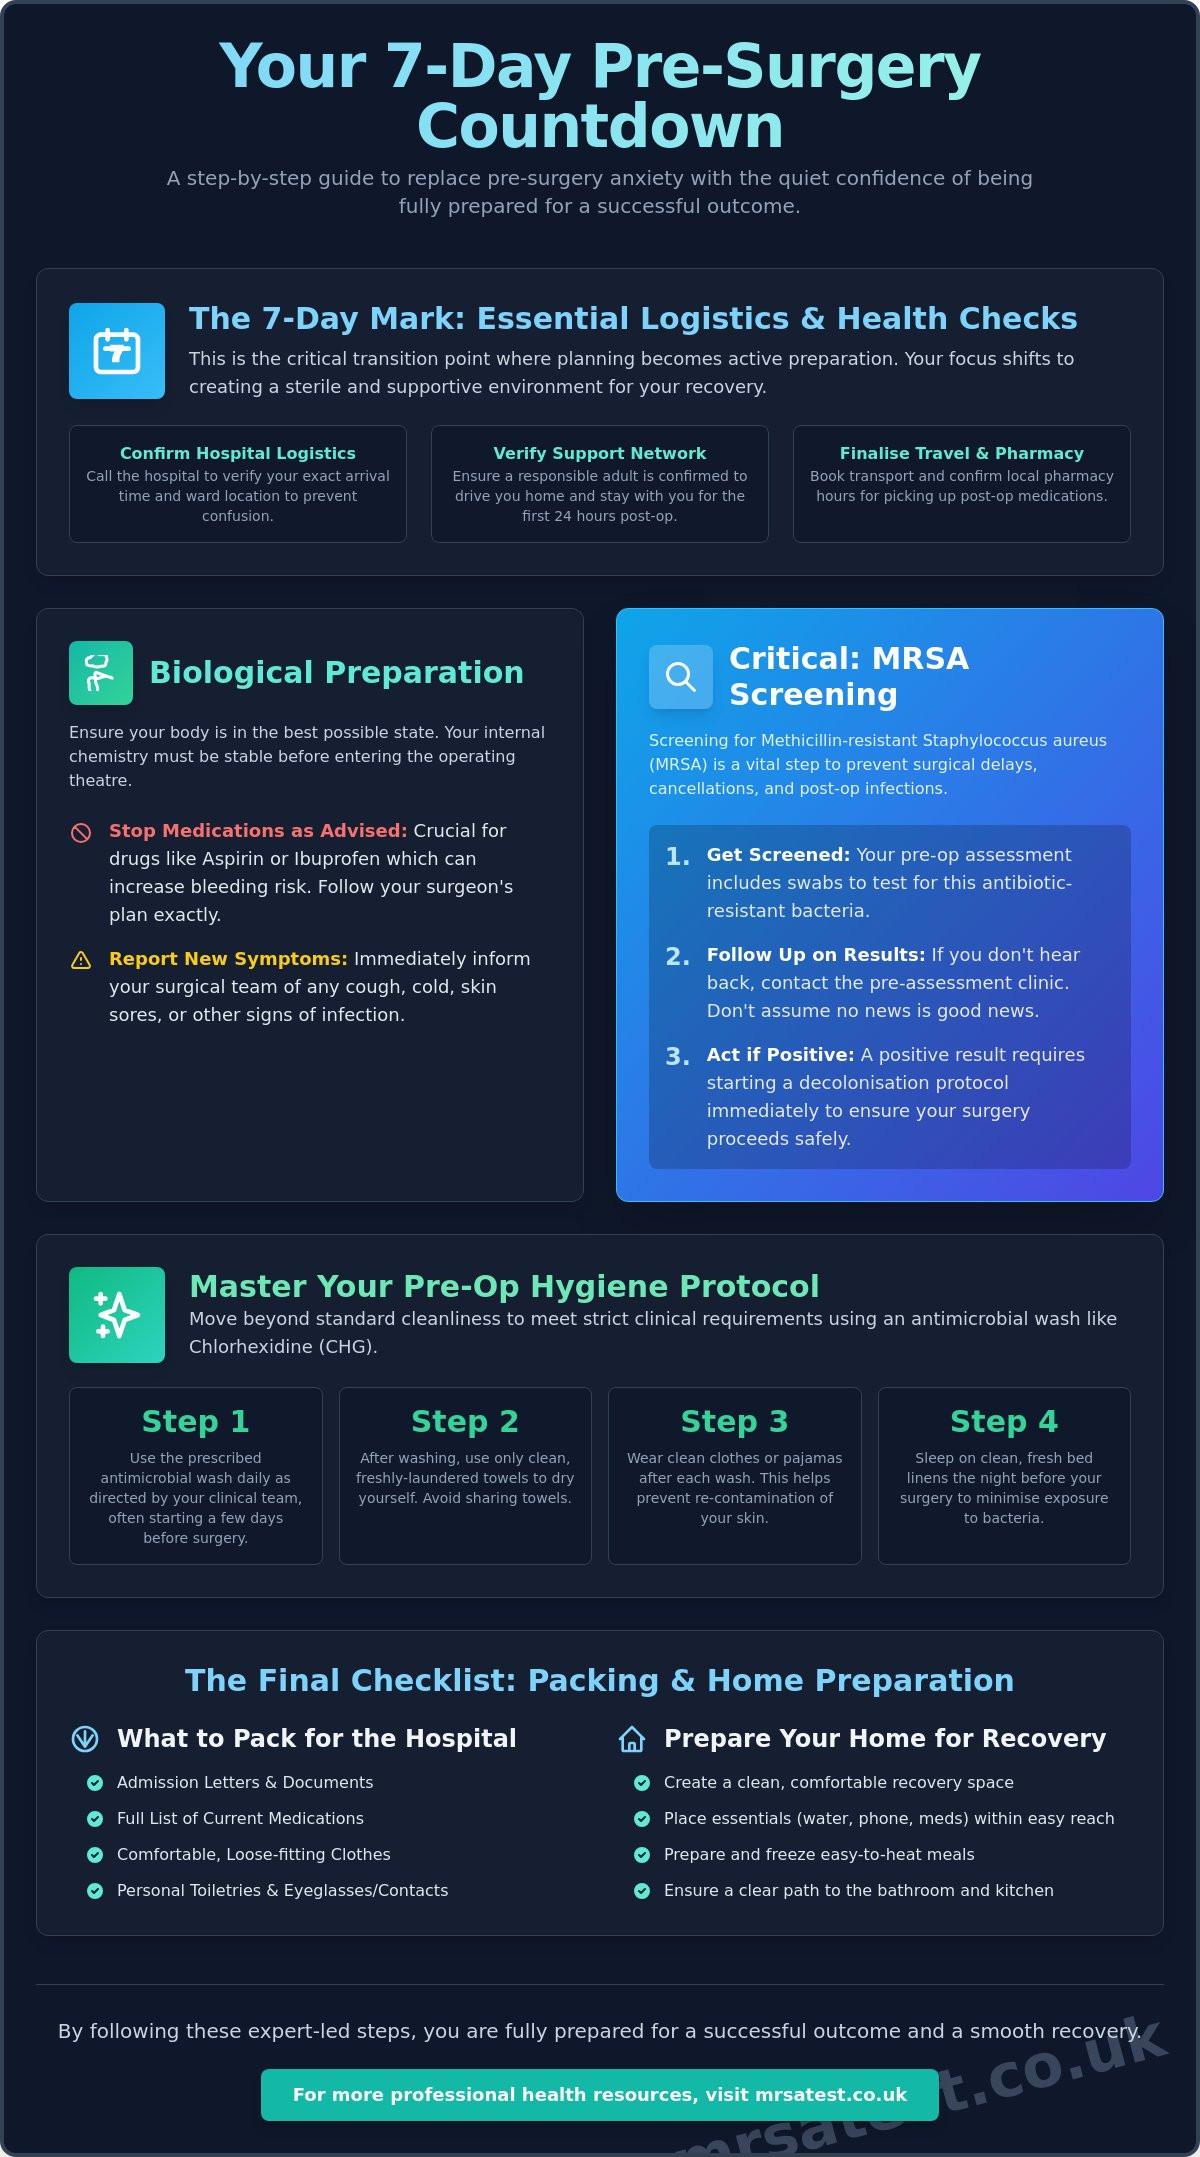
A Step-by-Step Guide to Your Final Pre-Op Hygiene Routine
Being socially clean means you look and smell pleasant to those around you. However, being clinically clean for surgery is a different standard entirely. The primary goal of a pre-operative hygiene routine is to reduce the bacterial load on your skin to the lowest possible level. This significantly lowers the risk of a surgical site infection (SSI). Following a structured pre-op MRSA screening checklist helps you transition from everyday hygiene to the rigorous standards required by the operating theatre. In the 48 hours before your procedure, you should also ensure your environment is as sterile as possible. This includes using fresh bed linens and clean towels after every wash to prevent re-contamination from your home environment.
If you haven’t yet confirmed your status to ensure your hygiene efforts are properly targeted, you can order an MRSA Rapid PCR Test for fast, professional results. Knowing your status allows you to approach this routine with the quiet competence that you’re fully prepared for a safe admission.
Antimicrobial Washing Instructions
Your hospital may provide a specific antimicrobial soap, such as Chlorhexidine (CHG), or advise you to purchase one. A standard protocol often begins five days before surgery. When washing, pay particular attention to areas where bacteria thrive, specifically the nose, armpits, and groin. Apply the wash to a clean sponge or flannel, lather well, and leave it on the skin for about one minute before rinsing thoroughly. Once you’ve completed your final wash on the morning of the operation, avoid applying any lotions, perfumes, or deodorants. These products can interfere with surgical adhesives or even harbour bacteria. Finally, always follow the “clean clothes rule” by dressing in freshly laundered clothing immediately after your final pre-op shower.
Nails, Hair, and Skin Restrictions
Clinical preparation extends to your physical appearance. All nail varnish and acrylic nails must be removed before you arrive at the hospital. This isn’t for aesthetic reasons; anaesthetists use pulse oximeters on your fingertips to monitor oxygen saturation during the procedure, and varnish can block the light sensor. You should also avoid shaving the surgical area yourself. Razors often create micro-cuts that act as breeding grounds for bacteria; surgeons prefer to use professional clippers in the sterile environment of the hospital if hair removal is necessary. Finally, remove all jewellery and piercings. Metal items can cause skin burns when surgical equipment is used, and they may also harbour bacteria that complicate your pre-op MRSA screening checklist goals.
The Final Checklist: Packing and Home Preparation
As you reach the final 48 hours before your procedure, your focus shifts from clinical hygiene to practical comfort. You’ve already managed your biological readiness by following your pre-op MRSA screening checklist; now it’s time to prepare your physical environment. Packing your hospital bag and organising your home ensures a seamless transition from the ward back to your own bed. This final stage is about reducing post-operative stress so you can focus entirely on healing. Having everything in its place allows you to enter the hospital with a sense of quiet competence and control.
The final 24-hour countdown is particularly important. This is when you’ll begin your fasting period, often referred to as NPO (nothing by mouth). Follow your hospital’s specific instructions regarding when to stop eating and drinking exactly. Use this time to do a final sanity check of your pre-op MRSA screening checklist to ensure all results are confirmed and your support network is ready for your discharge.
Your Hospital Bag Essentials
Setting Up Your Home for Recovery
Your “Recovery Zone” should be fully prepared before you leave for the hospital. Arrange your living space so that frequently used items, such as the TV remote, water, and medications, are at waist height. This prevents the need for unnecessary bending or stretching, which can strain incisions. Stock your kitchen with soft foods and easy-to-prepare meals like soups, yogurts, or pre-made frozen dishes. Don’t forget the logistical support required for your household. Arrange for someone to help with pets, watering plants, or heavy household chores during your first week home. By securing these details now, you create a supportive environment that promotes a faster, safer recovery.
Preparing for a Confident Admission
Transitioning from general preparation to the day of your surgery requires a structured and disciplined approach. By managing your medications, confirming hospital logistics, and following a rigorous hygiene routine, you significantly reduce the risk of avoidable complications. Using a professional pre-op MRSA screening checklist ensures that no detail is overlooked, from your final clinical wash to the readiness of your recovery zone at home. These proactive steps replace pre-surgery anxiety with a sense of quiet competence, allowing you to focus entirely on your healing process.
To ensure your surgery proceeds as planned, closing the “infection gap” between your initial assessment and your operation is essential. You can secure your peace of mind with a 24-hour MRSA Rapid PCR Test Kit. Our discreet and professional at-home service utilizes an accredited UK laboratory to provide results within 24 hours of lab receipt. This fast, reliable screening allows you to confirm your status with clinical accuracy before you arrive at the hospital. Taking control of your pre-operative health is the most effective way to support a smooth procedure and a swift return to your daily life. We wish you a safe operation and a steady recovery.
Frequently Asked Questions
Can I have my surgery if I have a cold one week before?
You can often proceed with a minor cold, but you must report any new symptoms to your surgical team immediately. While a slight sniffle might not cause a delay, a fever or a chesty cough can increase anaesthetic risks. The hospital will evaluate your fitness for surgery based on your symptoms and your recovery progress during the final week.
What happens if my MRSA test comes back positive 7 days before surgery?
If you test positive seven days before your procedure, you will start a five-day decolonisation protocol. This typically includes a specific nasal ointment and antimicrobial body wash to eliminate the bacteria. Identifying a positive status early via your pre-op MRSA screening checklist is vital. It provides the necessary window to complete the treatment, ensuring you are clear for your scheduled admission.
Why can’t I wear nail polish or gel nails during my operation?
Nail polish and gel nails must be removed because they interfere with pulse oximetry sensors used during surgery. These sensors clip onto your finger to monitor oxygen levels in your blood. Any barrier, such as thick gel or dark varnish, can prevent the sensor from providing the accurate, real-time readings your anaesthetist needs to keep you safe during the procedure.
How long before surgery should I stop smoking or vaping?
You should aim to stop smoking or vaping as early as possible, ideally several weeks before your operation. If that isn’t possible, stopping at least 24 to 48 hours before surgery significantly improves your body’s oxygen levels and heart rate. Quitting temporarily reduces the risk of breathing complications during anaesthesia and promotes much faster wound healing after the procedure.
Can I drink water on the morning of my surgery?
You can typically drink clear water up to two hours before your scheduled arrival time, but you must follow your hospital’s specific instructions exactly. Some procedures require a stricter fasting window where no fluids are allowed at all. Drinking water too close to your surgery time can lead to the cancellation of your procedure for your own safety.
What should I do if I forget to stop my medication 7 days before?
Contact your hospital’s pre-assessment clinic or anaesthetic department immediately if you forget to stop a medication. Don’t wait until the morning of your surgery to disclose this. Depending on the drug, such as a blood thinner or certain herbal supplements, the surgical team will decide if it’s safe to proceed or if a short delay is required.
Do I need to shave the area where the surgery will happen?
You should not shave the surgical site yourself before arriving at the hospital. Shaving with a standard razor can cause tiny nicks or abrasions that become breeding grounds for bacteria. If hair removal is required for the procedure, clinical staff will use professional medical clippers in a sterile environment to minimise the risk of a surgical site infection.
Why is a PCR MRSA test better than a culture test when I’m in a hurry?
A PCR test is more effective for urgent timelines because it identifies bacterial genetic material rather than waiting for organisms to grow. This method provides results in a fraction of the time required for traditional cultures. Integrating a rapid PCR test into your pre-op MRSA screening checklist gives you a clear answer within 24 hours of the lab receiving your sample.
Similar Posts
Positive MRSA Test: What Next? A Reassuring Guide to Your Results
On Tuesday morning, Sarah received a call from her hospital’s pre-assessment clinic with news that felt like a major setback; her routine screening…
When to Worry About a Surgical Wound: Signs of Infection and Post-Op Care
Imagine you are three days into your recovery at home after a successful procedure. You notice a slight pinkness around your incision and feel a…
MRSA Test Kit Next Day Delivery: Fast Pre-Op Screening in the UK
Last Tuesday, Sarah discovered her elective surgery was only 72 hours away, but her required pre-operative MRSA screening had been overlooked. The…
Why Do Hospitals Screen for MRSA? Protecting Patients and Surgery Success
Did you know that according to NHS estimates, approximately 1 in 30 people in the UK carry MRSA bacteria on their skin or in their nose, often…
Feeling Anxious About Hospital Stay: A Practical Guide to Regaining Control
According to a 2023 report by the Patients Association, nearly 45% of individuals scheduled for elective surgery in the UK experience significant…
MRSA Carrier But No Infection: Understanding Colonisation in 2026
Did you know that approximately 5% of hospital patients carry MRSA on their skin or in their nose without showing a single symptom? It’s a confusing…