How to Swab Your Nose for MRSA: A Step-by-Step Patient Guide
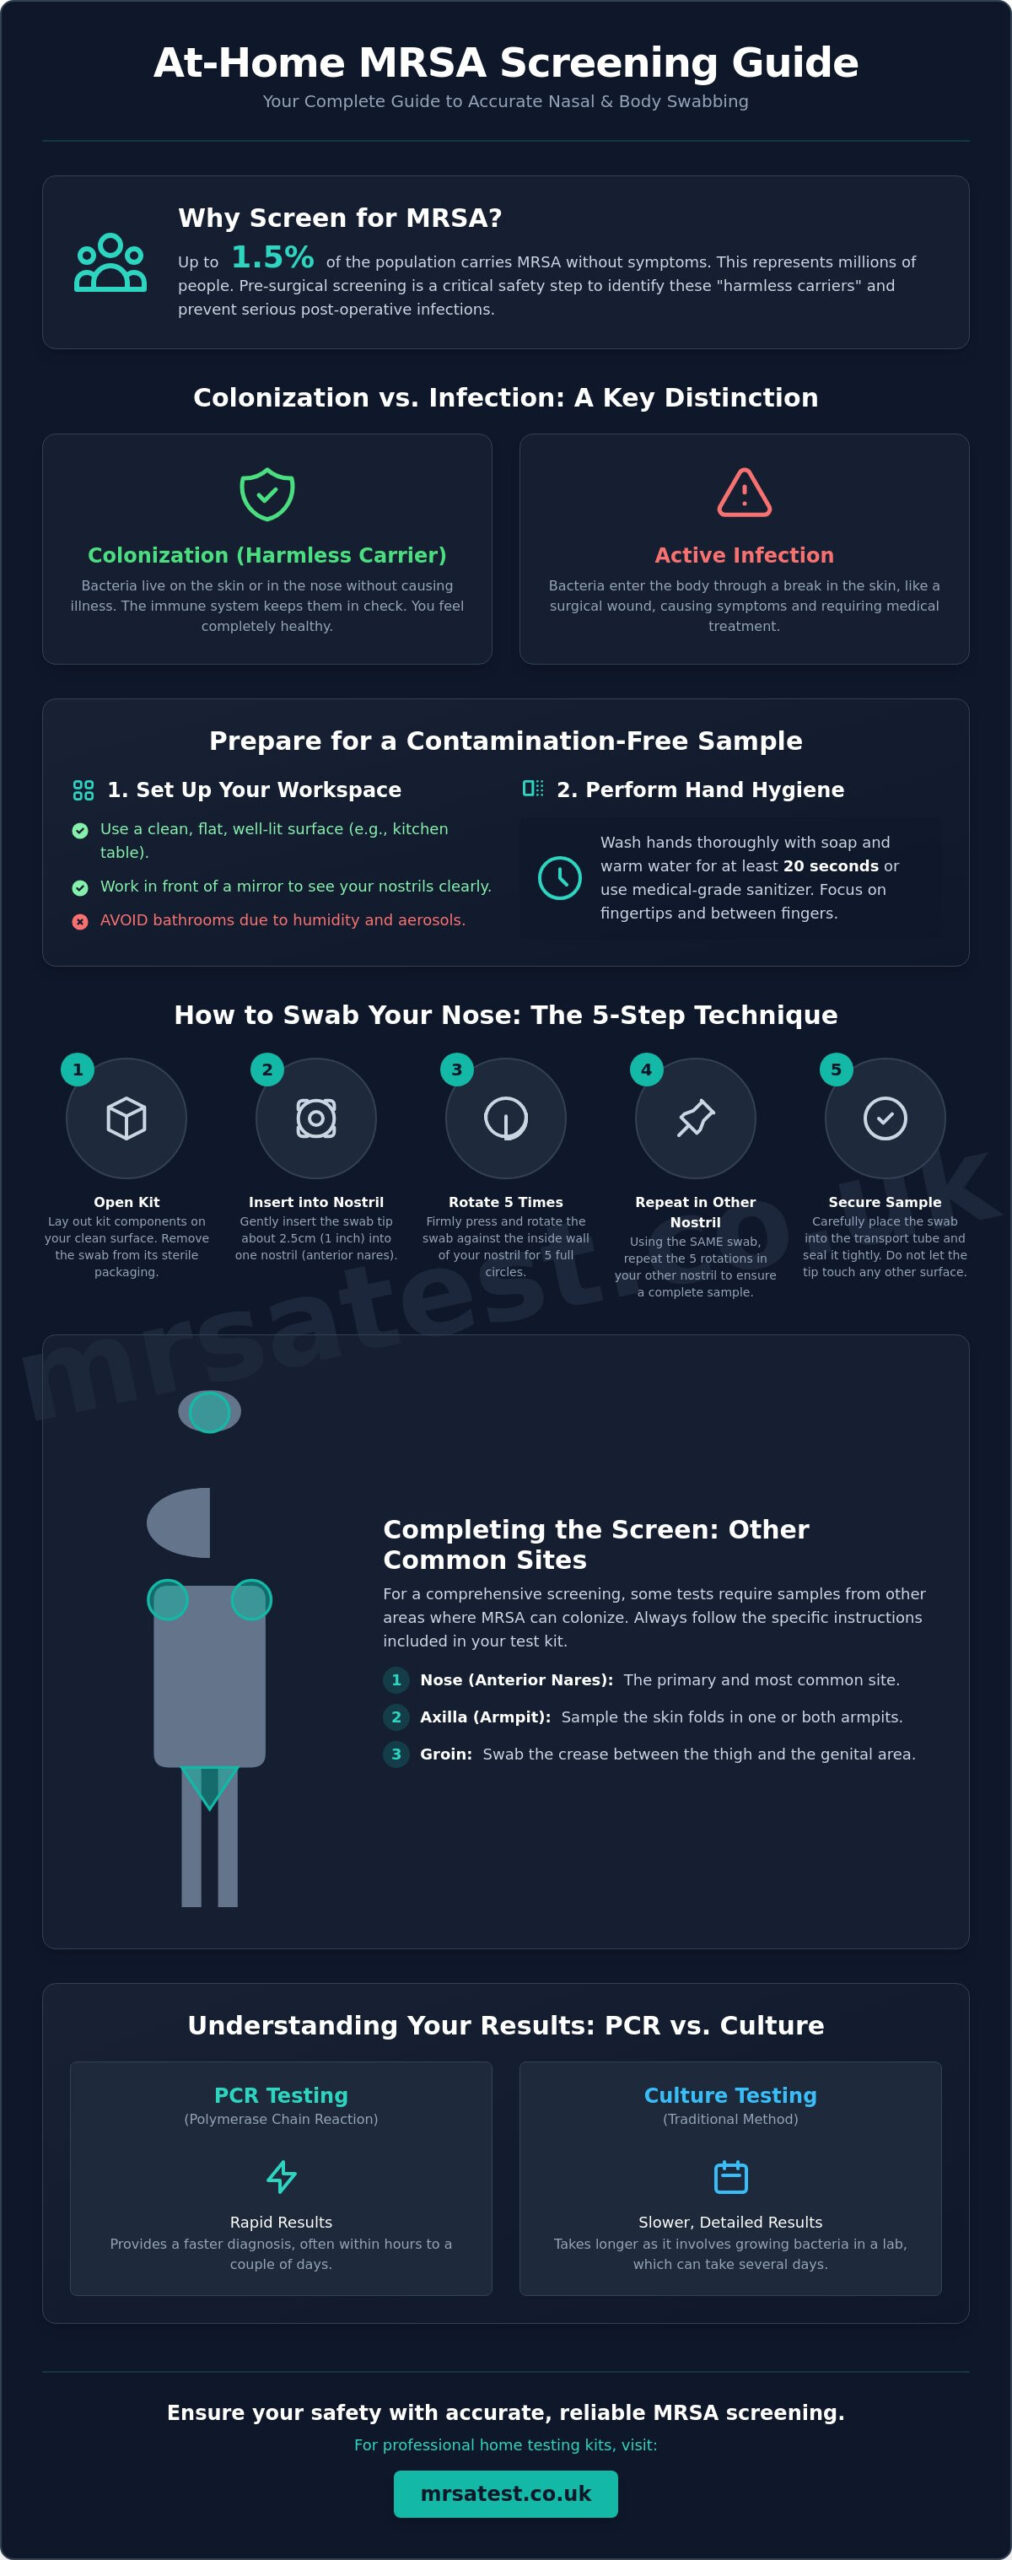
Did you know that up to 1.5% of the U.S. population carries MRSA in their nose without even knowing it? While that percentage sounds small, it represents millions of people who may face unexpected complications before a hospital procedure. If your healthcare provider has requested a screening, you’re likely wondering how to swab your nose for mrsa to ensure your results are accurate. It’s natural to feel anxious about technical medical instructions, especially when a surgery date depends on a valid lab sample.
We understand that performing clinical tasks at home can feel overwhelming. You want to get it right the first time to avoid the frustration of a rejected sample or a false negative result. This guide will help you master the correct clinical technique for MRSA nasal swabbing so you can provide a high quality specimen from your own home. We’ll walk you through the preparation, the specific rotation method required for the nares, and how to secure your sample for the laboratory. By the end of this article, you’ll have the clear understanding and peace of mind needed to complete your screening with confidence.
Key Takeaways
- Understand the clinical difference between MRSA colonization and active infection, and why the nose is the primary site for accurate screening.
- Prepare a sterile workspace and master the professional hand hygiene protocols necessary to avoid sample contamination.
- Learn exactly how to swab your nose for mrsa with a step-by-step technique designed to collect a valid, lab-ready specimen.
- Discover why swabbing the groin and axilla is often essential for a complete screen and how to correctly sample these skin folds.
- Ensure your results are reliable by following precise storage instructions and understanding the diagnostic timelines for PCR versus culture testing.
Understanding MRSA Colonisation: Why the Nose is the Primary Site
Methicillin-resistant Staphylococcus aureus, or MRSA, is a specific type of bacteria that has developed resistance to several widely used antibiotics. While the name can sound intimidating, it’s actually a common skin bacterium found on many healthy people. To better understand your screening, it helps to start with the basics of What is MRSA? and how it interacts with the human body.
In the United States, research indicates that the rate of MRSA colonization in the general population is estimated to be between 0.9% and 1.5%. Most people who carry these bacteria are entirely unaware of it because the organisms live harmlessly on the surface of the skin or inside the nostrils. Identifying these carriers is a critical step in modern healthcare, particularly before hospital admission or major surgery.
Colonisation vs. Infection: What You Need to Know
It’s vital to understand that carrying MRSA doesn’t mean you’re sick. This state is known as ‘colonisation,’ where the bacteria live on you without causing any symptoms or harm. You aren’t in immediate danger, and your immune system is keeping everything in balance. An ‘active infection’ only occurs if the bacteria find a way to enter the body, such as through a surgical incision or a break in the skin. For more detail on this distinction, you can read What Is MRSA? Your Complete Guide to Symptoms, Causes & Risks.
The primary concern during a hospital stay is that these ‘passenger’ bacteria can migrate from your nose to a fresh surgical wound. This transition can lead to complications that are harder to treat than standard infections. Screening allows medical teams to take proactive steps, such as using antiseptic washes, to clear the bacteria before your procedure begins.
The Importance of Accurate Nasal Screening
The nose is the preferred reservoir for MRSA because it provides a warm, moist environment where the bacteria can thrive. Clinical professionals specifically target the anterior nares. We define the anterior nares as the skin just inside the nostril opening. Because this is the most common site of colonization, a nasal swab is the gold standard for pre-operative screening in the UK and internationally.
Precision is essential when you’re learning how to swab your nose for mrsa at home. A poorly taken swab might not pick up enough bacteria, leading to a ‘false negative’ result. This gives both you and your surgical team a false sense of security. If the lab doesn’t receive a high-quality sample, the risk of post-operative infection remains unmanaged, which is why following the correct technique is the best way to ensure your safety and avoid surgery delays.
Preparing for Your At-Home MRSA Swab: Hygiene and Kit Setup
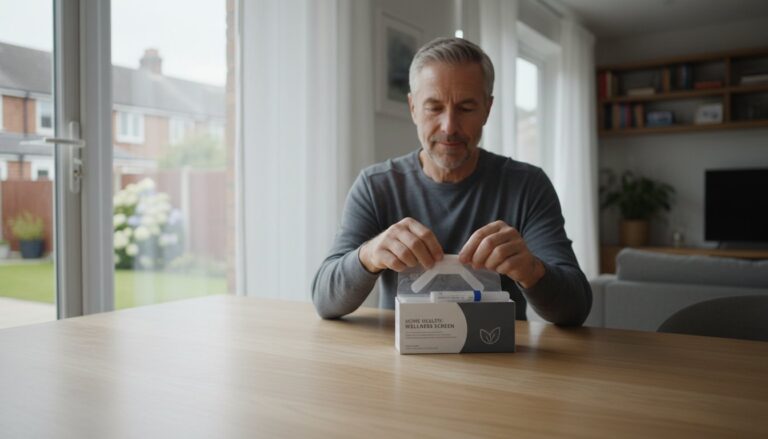
Once you understand the clinical necessity of screening, the next step is ensuring your environment is ready for a professional quality sample collection. Unlike a hospital setting where surfaces are managed by staff, performing this at home requires you to take charge of the “sterile field.” Knowing how to swab your nose for mrsa correctly starts with a well-organized workspace. We recommend choosing a clean, flat surface in a well-lit area, ideally in front of a mirror so you can see the opening of your nostrils clearly.
Before you even open your kit, hand hygiene is the most critical factor in preventing cross-contamination. Clinical professionals use the ‘Ayliffe technique,’ a structured six-step method to ensure every part of the hand is decontaminated. If you don’t have medical-grade sanitizer, a thorough wash with warm soap and water for at least 20 seconds is sufficient. Focus on the fingertips and the areas between your fingers, as these are the parts most likely to touch the sampling equipment. If you’re feeling uncertain about the process, Understanding MRSA Tests can provide further context on why these sterile precautions are so vital for a valid result.
Creating a Sterile Environment at Home
While it might seem convenient, avoid performing your swab in a bathroom, especially if someone has recently showered. High humidity and the presence of aerosols from toilets or sinks can compromise the integrity of your sample. Instead, use a kitchen or dining table that you’ve wiped down with a standard disinfectant. Lay out a clean piece of paper towel as a base for your kit components. When you unpack the transport tube, ensure it stays upright. These tubes often contain a small amount of liquid or gel preservative designed to keep the bacteria alive during transit. Spilling this media can lead to a rejected sample at the laboratory.
Checking Your Kit Contents
Every screening kit should be inspected before use. First, verify the expiry date on the swab packaging. If the seal is broken or the date has passed, the swab is no longer sterile and shouldn’t be used. If your kit is for a full body screen, you’ll likely see multiple swabs. It’s helpful to distinguish between them now; some kits use color-coded caps to separate the nose, groin, and axilla samples.
A professional tip is to pre-fill your labels or request forms before you start swabbing. This prevents you from having to handle the tube excessively once the sample is secured inside. Remember the ‘Golden Rule’ of clinical sampling: never touch the cotton tip or the shaft of the swab with your fingers. Any contact with your skin or the table surface will contaminate the test with unrelated bacteria. If you need a reliable kit to get started, you can order a professional MRSA screening kit that includes all the necessary components for home use.
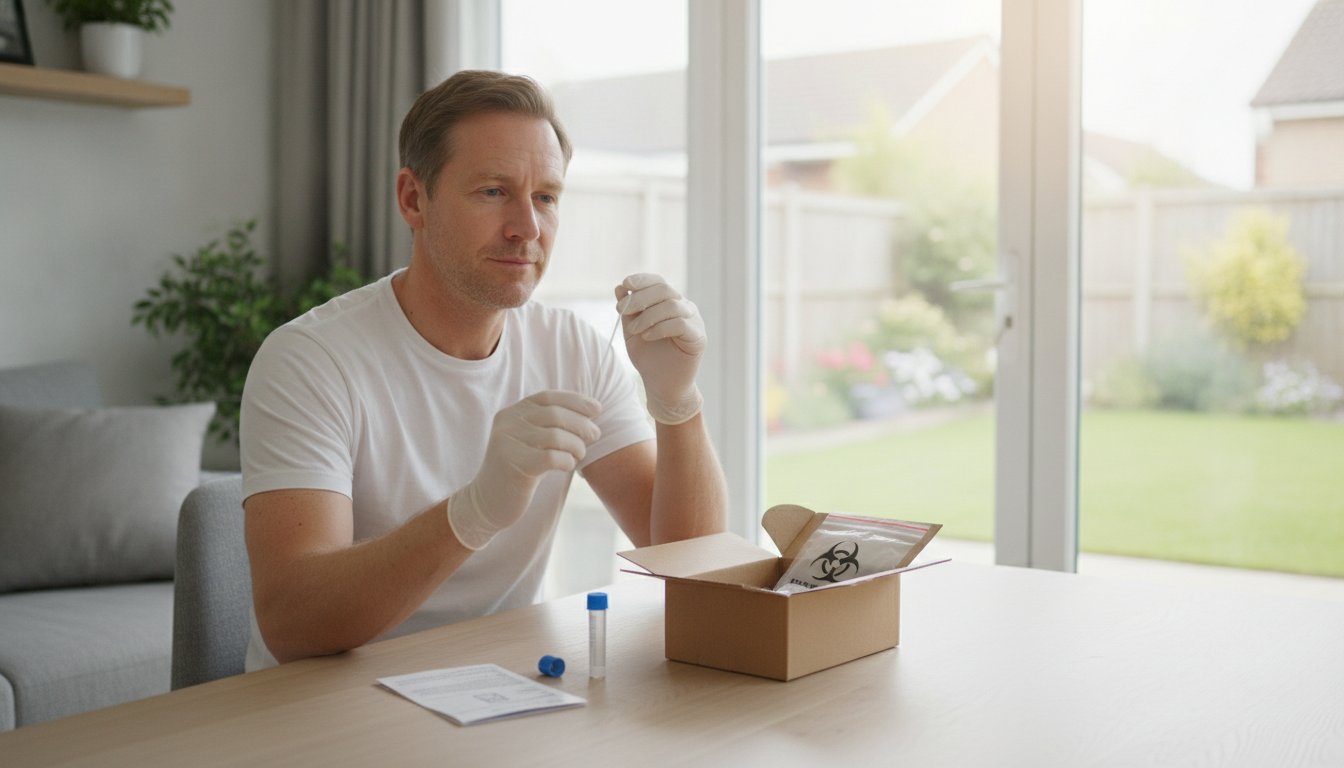
Step-by-Step Guide: How to Swab Your Nose for MRSA Correctly
Precision is the most important factor when you’re learning how to swab your nose for mrsa. While the process is quick, the quality of your sample determines the accuracy of the lab result. Start by positioning yourself in front of a mirror and tilting your head back slightly. This posture opens the nasal passages and gives you a clear view of the anterior nares, which is the area just inside the nostril. Using a mirror isn’t just for convenience; it helps you avoid touching the outer skin of your face, which could contaminate the swab with unrelated bacteria.
Before you begin, check if your kit requires the swab to be moistened. If you have a very dry nose, the cotton tip may struggle to pick up enough biological material. Some professional kits include a small vial of sterile saline for this purpose. If provided, dip the tip into the saline just enough to dampen it; it shouldn’t be dripping wet. This moisture helps the swab “grip” the skin cells where MRSA typically resides. For a visual reference on these preparations, you can consult these step-by-step swabbing instructions provided by clinical experts.
The Nasal Swab Procedure
Follow these three steps carefully to ensure a high-quality sample. The goal is to collect skin cells and moisture, not just nasal mucus.
- Step 1: Carefully remove the swab from its packaging. Gently insert the cotton tip approximately 1-2cm into the first nostril. You don’t need to go deep; the bacteria live on the skin surface near the opening.
- Step 2: Rotate the swab firmly but gently against the inside wall of the nostril. You should complete five full rotations, which takes about five seconds. This “5-second rule” provides the necessary friction to lift bacteria from the epithelial cells.
- Step 3: Using the SAME swab, repeat the exact same process in the second nostril. There’s no need for a second swab; the laboratory needs the combined material from both sides for a comprehensive screen.
Common Mistakes to Avoid During Collection
One of the most frequent errors is touching the vestibule, which is the hairy outer entrance of the nose, or the skin on the tip of your nose. These areas carry different bacterial colonies that can interfere with the MRSA detection process. Focus your swabbing strictly on the smooth skin just inside the nostril. Additionally, once you’ve finished swabbing, transfer the tip directly into the transport tube. Don’t “swish” the swab in the air or lay it down on the table, as environmental dust and spores can quickly settle on the moist tip and compromise your results. Securing the sample immediately ensures the bacteria collected remain viable for the laboratory’s analysis.
Completing the Screen: Swabbing the Groin and Other Body Sites
While you’ve mastered how to swab your nose for mrsa, many healthcare providers require a more comprehensive screen to ensure patient safety before a procedure. Bacteria don’t just live in the nostrils. They often colonize other warm, moist areas of the body known as skin folds or intertriginous zones. Identifying these secondary reservoirs is essential because MRSA can easily transfer from these sites to a surgical wound during recovery.
A full clinical screen typically includes the groin and the axilla, which is the medical term for the armpit. In specific clinical protocols, your doctor might also request a throat swab. Using multiple swabs requires careful organization. It’s vital to ensure each swab is placed into its designated transport tube. Mixing these up can lead to confusing results for your medical team. If you’re managing multiple body sites, we recommend completing the nasal swab first, then moving to the skin sites to maintain a logical workflow.
How to Swab the Groin and Axilla
When sampling the groin, you’re looking for the ‘crease’ where the leg meets the torso. This area provides the ideal environment for bacterial colonization. For the axilla, ensure your armpit is free from deodorants, antiperspirants, or body powders before you begin. These products contain chemicals that can interfere with the sensitivity of a Rapid PCR test or inhibit the growth of a culture in the lab.
To collect a high quality sample, use a firm back-and-forth motion for approximately five seconds per side. You need to apply enough pressure to ‘lift’ the bacteria from the skin surface rather than just brushing the top of the hair. If your kit provides a single swab for both sides of the groin, use one half of the cotton tip for the left and the other half for the right. If you’re feeling overwhelmed by these requirements, our Preparing for Surgery: A Complete Pre-Op Health & Logistics Checklist can help you stay organized.
Labelling and Packaging for Transit
Once your samples are collected, the way you label them is just as important as the swabbing technique. Place your identification labels longitudinally, which means lengthwise along the tube. Don’t wrap them around the tube like a flag; this makes it difficult for laboratory scanners to read the barcode or your details. After labeling, place the tubes into the secondary packaging, which is usually a clear biohazard bag with a seal. This leak-proof layer is a legal requirement for transporting biological samples and protects the postal workers and laboratory staff who handle your kit. To ensure you have the correct equipment for a full screen, you can order an MRSA Rapid PCR Test for the nose, groin, and axilla today.
After the Swab: Sample Care and Understanding Your Results
Once you’ve completed the collection process, the final step in ensuring an accurate result is proper sample management. While you’ve mastered how to swab your nose for mrsa, the viability of the bacteria on that swab depends on how you handle it before it reaches the lab. Unlike some medical tests that require refrigeration, MRSA swabs should be kept at room temperature. Extreme cold or heat can damage the sample, so avoid leaving your kit in a car or near a radiator. We recommend sending your completed kit back to the laboratory immediately to prevent any degradation of the biological material.
Timely dispatch is particularly important if you have a looming surgical deadline. The transition from your home to the lab is a secure process, but speed ensures the preservative media in the tube remains effective. By following these storage guidelines, you’re protecting the integrity of the data that your surgical team relies on for your safety. A sample that is delayed in the post for several days may produce an unreliable result, which could lead to further testing and delays.
PCR vs. Culture: Which Result is Faster?
Choosing the right test depends on your timeline and your hospital’s requirements. A Rapid PCR test is the modern clinical standard for speed. It works by looking for specific DNA sequences of the MRSA bacteria. Because it doesn’t require the bacteria to grow, results are often available within 24 hours of the lab receiving the sample. This makes it highly sensitive and ideal for patients with urgent pre-operative deadlines.
In contrast, a standard Culture test is the traditional method used by many NHS trusts. This involves placing your sample in a petri dish and waiting to see if bacteria grow, which typically takes 48 to 72 hours. While slower, it remains a reliable diagnostic tool. mrsatest.co.uk provides both options with UKAS-accredited laboratory backing. The swabbing technique remains exactly the same regardless of which technology the lab uses to analyze your specimen.
What Happens if Your Result is Positive?
Receiving a positive result can feel concerning, but it’s important to remember that this simply means you are a carrier. It doesn’t mean you are ill or that your surgery will be cancelled. In most cases, a positive screen just triggers a standard decolonisation treatment known as the ‘Triple Pack.’ This usually includes Mupirocin nasal ointment and a Chlorhexidine antimicrobial body wash.
This treatment is highly effective and typically lasts for five days. It significantly reduces the risk of the bacteria causing an infection during your recovery. Once the treatment is complete, your medical team may ask for a repeat screen to confirm the bacteria have cleared. If you need peace of mind before a procedure, you can order your confidential MRSA Rapid PCR or Culture test kit here for fast, accurate results delivered directly to your inbox.
Take Control of Your Pre-Operative Health
Mastering the clinical technique for how to swab your nose for mrsa is a vital part of your surgical preparation. By maintaining a sterile environment and following the precise five-second rotation rule, you ensure your laboratory sample is valid and ready for analysis. Accurate screening is a partnership between your careful home collection and professional diagnostic technology. This proactive approach doesn’t just satisfy hospital requirements; it protects your health throughout your recovery journey.
If you’re ready to secure your results with clinical precision, you can Order Your Professional MRSA Home Test Kit Now. We provide UKAS Accredited Laboratory Testing with rapid 24-hour PCR results available to meet strict hospital deadlines. Every kit is delivered in discreet, plain packaging for your total privacy and peace of mind. Taking this step ensures you’re supported by experts through a simple, well-managed process. You now have the tools and the confidence to complete your screening safely and move forward with your procedure.
Frequently Asked Questions
Does the MRSA nasal swab hurt?
No, the procedure is generally painless and non-invasive. You’ll feel a gentle rotation against the skin just inside your nostril, which might cause a slight tickle or the urge to sneeze. It shouldn’t cause any sharp pain or bleeding. The process is designed to be quick and comfortable while still collecting the necessary biological material for the laboratory.
Can I swab my nose if I have a cold or a runny nose?
Yes, you can still perform the test if you have a cold. We recommend blowing your nose gently before you begin to remove excess mucus. This ensures the swab makes direct contact with the skin cells of the anterior nares rather than just nasal secretions. If your nose is severely congested or irritated, wait a day or two for the symptoms to subside if your deadline allows.
What happens if I touch the tip of the swab by accident?
If you touch the cotton tip with your fingers or any other surface, the swab is considered contaminated. Your skin carries various unrelated bacteria that can interfere with the diagnostic process. Using a contaminated swab may lead to an invalid result or a false positive. If this occurs, it’s best to use a fresh, sterile swab from a new kit to ensure your sample remains lab-ready.
How deep does the swab need to go into my nostril?
You only need to insert the swab approximately 1 to 2cm into the nostril opening. This is the area where the bacteria are most likely to reside. There’s no clinical benefit to pushing the swab deeper into the nasal cavity. Focusing on the skin just inside the nostril provides the most accurate reservoir for screening while maintaining your comfort throughout the process.
Do I need to swab both nostrils with the same swab?
Yes, the standard clinical protocol for how to swab your nose for mrsa requires using the same swab for both nostrils. This technique ensures that the laboratory receives a concentrated sample of biological material from both sides. By using a single swab, you increase the likelihood of detecting the bacteria if they are present in either nostril, leading to a more reliable result.
How long can I keep the sample at home before posting it?
You should post your sample on the same day you collect it. While the transport media in the tube is designed to keep the bacteria viable during transit, immediate dispatch is the best way to ensure a high-quality result. If you can’t get to a post box immediately, keep the tube at room temperature and ensure it’s sent within 24 hours to avoid sample degradation.
Can I use a standard cotton bud (Q-tip) if I lose my kit swab?
No, you must never use a standard household cotton bud for medical screening. These products aren’t sterile and don’t include the specialized transport media required to keep the sample stable. A household bud will likely introduce environmental contaminants and won’t survive the journey to the lab. If you lose your clinical swab, you’ll need to order a replacement kit to ensure the test is valid.
Will the lab results be sent directly to my hospital?
If you’re using a private screening service, the results are typically sent directly to you via a secure digital report. This allows you to review your status privately before sharing the information. You can then forward the accredited laboratory report to your hospital admissions team or surgeon. This process ensures you have a copy for your own records while providing the hospital with the official clearance they need.