How to Use a Home MRSA Test Kit: A Step-by-Step Guide for 2026
Imagine you’re just 72 hours away from a scheduled surgery, but the only thing standing between you and the operating theatre is a successful screening result. It’s a common scenario for many in the UK, where 2026 clinical guidelines require clear MRSA status before admission to prevent healthcare-associated infections. If you’re feeling anxious about how to use a home mrsa test kit correctly, you aren’t alone. You want to avoid an invalid or “void” result that could postpone your procedure and disrupt your recovery timeline.
We understand that performing your own clinical swabbing can feel daunting when your health and schedule are at stake. It’s vital to follow a precise protocol to ensure your sample is valid for our UKAS-accredited partner laboratory. This guide provides a clear, step-by-step breakdown of the current standards for at-home swabbing to ensure clinical-grade accuracy. We’ll show you exactly which body sites to swab, how to handle the equipment safely, and how to secure your results with professional confidence. We’ll walk you through the entire process from kit preparation to discreet collection, giving you total peace of mind before your hospital date.
Key Takeaways
- Learn the professional clinical protocol for identifying MRSA colonisation to ensure your results are valid for hospital pre-surgery screening.
- Follow our clear, expert instructions on how to use a home mrsa test kit to capture a high-quality sample with clinical precision.
- Identify the most common swabbing errors that lead to invalid results and learn how to maintain the sterility of your collection tool.
- Optimise your result turnaround by mastering the correct timing for sample collection and using our discreet Royal Mail Tracked 24 postal service.
- Discover how our UKAS-accredited laboratory testing provides a faster, professional-grade alternative to traditional NHS screening timelines.
How to Use a Home MRSA Test Kit: The Fundamentals
Learning how to use a home mrsa test kit correctly is the first step toward ensuring your safety before a medical procedure. An MRSA home test kit serves as a private self-collection tool designed to identify Methicillin-resistant Staphylococcus aureus (MRSA) colonisation on the body. This process doesn’t diagnose a sick patient; instead, it looks for the presence of bacteria living harmlessly on the skin or in the nose that could cause trouble later.
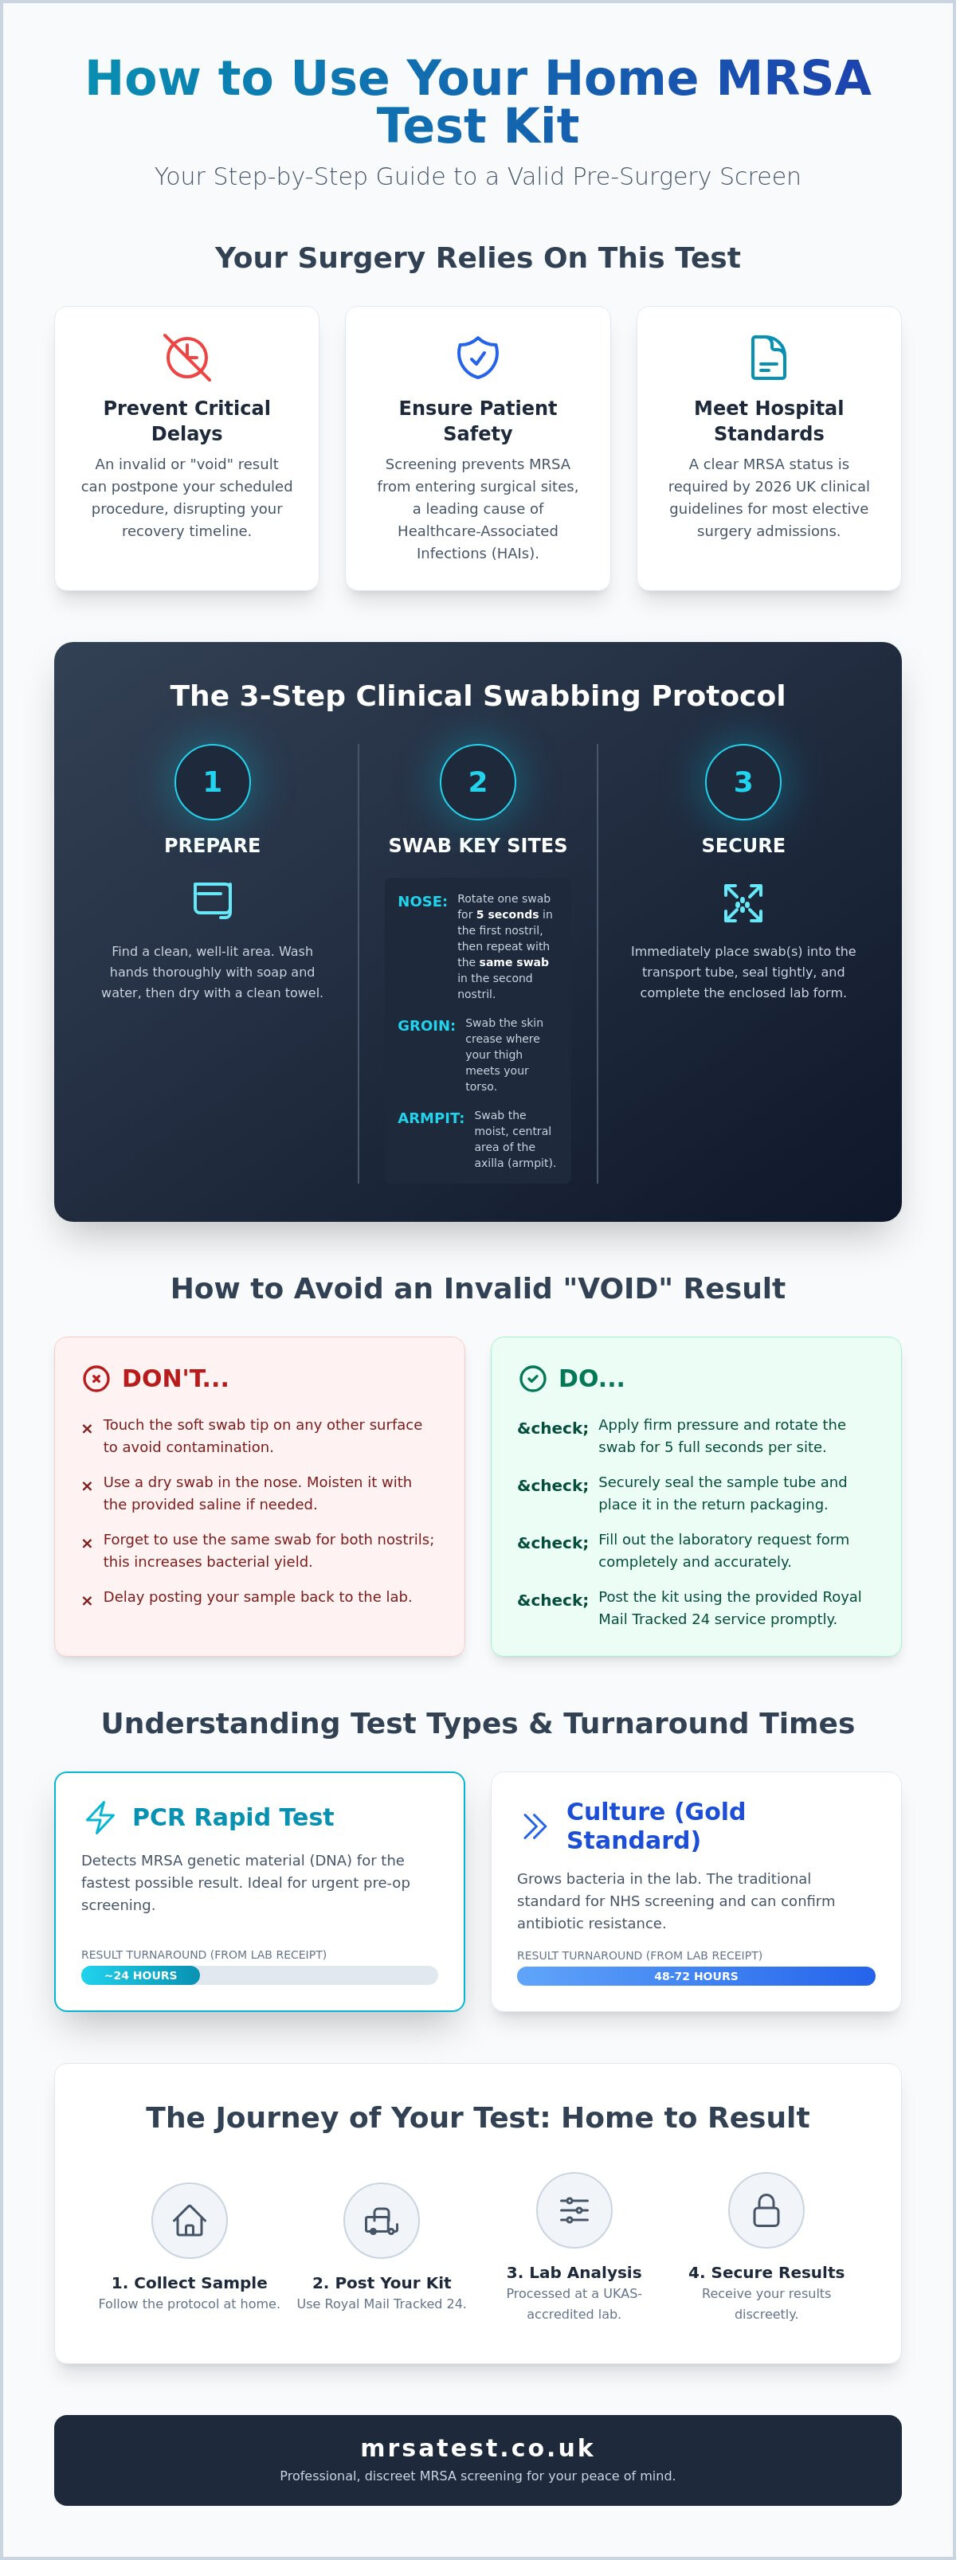
Accuracy isn’t just a preference. It’s a clinical necessity. UK hospitals require valid screening results to mitigate the risk of healthcare-associated infections (HAIs) during surgery. According to 2024 infection control protocols, a positive colonisation result must be addressed before most elective operations proceed. This prevents the bacteria from entering the bloodstream or surgical site, where it could cause serious complications.
Your kit includes several essential components to ensure a high-quality sample. You’ll find sterile swabs, transport tubes containing a stabilising medium, a laboratory request form, and secure, prepaid return packaging. It’s vital to distinguish between screening for colonisation and testing an active infection. Home kits focus on skin surface screening, usually targeting the nostrils, throat, and groin. If you have a weeping wound, redness, or a painful abscess, you require a clinical diagnostic test for an active infection rather than a standard screening kit.
When Should You Use a Home Kit?
Most users order a kit when preparing for elective surgery. Many UK NHS trusts and private hospitals mandate a clear screen within 30 days of admission. You might also choose to test if you’ve recently been a patient in a high-risk healthcare environment or if you’re monitoring the success of a prescribed decolonisation programme. Knowing your status from the comfort of your home provides peace of mind and allows for early intervention if needed.
PCR vs. Culture Kits: Handling Differences
PCR kits detect bacterial DNA and provide rapid results, often within 24 hours of reaching the laboratory. These require a prompt return to ensure the molecular markers remain detectable. Culture kits, which involve growing the bacteria over 48 to 72 hours, are the traditional standard for most UK pre-op requirements. They allow the lab to confirm exactly which antibiotics the strain resists. Choosing the right kit is essential, as the wrong method might not meet your hospital’s specific criteria, potentially delaying your surgery date.
Step-by-Step Instructions for Taking Your MRSA Swabs
Understanding how to use a home MRSA test kit correctly is the first step toward getting a fast, reliable result. Accuracy depends heavily on your technique during the sample collection process. Before you begin, find a clean, well-lit area such as a bathroom where you have access to a mirror. Wash your hands thoroughly with soap and warm water, then dry them with a fresh towel to prevent any external contamination of the sterile swabs.
The collection process typically involves three specific areas of the body where MRSA bacteria are most likely to reside. These sites are the nostrils, the groin, and the armpits. By following a clinical protocol, you ensure the lab receives a high-quality sample for either a culture test or a PCR rapid test. Following these professional steps for how to take your own swabs ensures you get a valid result that you can trust.
The Nose Swabbing Protocol
The nose is the primary site for MRSA colonisation. If your swab tip appears dry, you should moisten it using the sterile saline ampoule provided in your kit. This helps the bacteria adhere to the fibres. Insert the sterile tip approximately 2cm into your first nostril. You don’t need to go deep, but you must ensure the swab makes contact with the inside wall.
- The 5-second rule: Rotate the swab firmly against the inside of the nostril for a full five seconds. This duration is critical for gathering enough material for molecular detection.
- Dual-nostril sampling: Use the exact same swab for your second nostril. Using one swab for both sides increases the bacterial yield, making it easier for the UKAS-accredited facility to detect the presence of MRSA.
Swabbing the Groin and Axilla
MRSA thrives in warm, moist environments, which is why the groin and axilla (armpit) are key reservoirs for the bacteria. When swabbing the groin, identify the skin fold where the leg meets the torso. Rub the swab back and forth across this area for five seconds, ensuring you cover at least 5cm of the skin fold. If your kit includes a third swab for the axilla, follow the same motion across the deepest part of the armpit.
Once the collection is complete, you must secure the sample immediately. Place the swab into the transport tube, being careful not to touch the tip against the rim or any other surfaces. Most modern kits feature a pre-scored line on the swab handle. You can simply snap the handle at this point so the tube caps tightly. This keeps the sample stable during transit to the laboratory. If you want to ensure your screening is handled with the highest level of care, you can order a professional MRSA home test kit that includes everything you need for a confidential and accurate result.
Avoiding Common Errors: Ensuring Your Sample is Valid
Accuracy depends entirely on the quality of the sample you provide. Most “invalid” results from UKAS-accredited laboratories stem from simple collection mistakes rather than defects in the equipment. When you learn how to use a home mrsa test kit, your primary goal is to capture only the bacteria present in the specific target area without introducing outside contaminants.
The most frequent cause of a failed test is contamination from external skin or household surfaces. If the swab tip touches your fingertip, a table, or your clothing, it picks up thousands of unrelated microbes. This makes it impossible for the lab to provide a clear “positive” or “negative” for MRSA colonisation. Precision is your best tool for a fast, reliable result.
Contamination and How to Prevent It
Maintaining a sterile environment is simpler than it sounds. You should clear a small area on a clean surface before opening your kit. Don’t let the sterile swab touch anything other than the site being tested. If you’re testing your nose, for example, the swab should go directly from its packaging to your nostril and then straight into the transport tube.
- The “Click” Rule: When placing the swab into the plastic tube, push firmly until you hear or feel a distinct “click.” This ensures the cap is airtight. If it isn’t sealed, the transport media can leak or dry out, ruining the sample during transit.
- The Drop Rule: Accidents happen. If you drop the swab on the floor or a rug, it’s no longer sterile. Don’t try to rinse it or use it anyway. You’ll need to order a replacement kit to ensure your data remains clinically valid.
- Avoid the Tip: Never touch the cotton end of the swab with your fingers. Even “clean” hands carry oils and skin cells that interfere with the molecular detection process.
Labelling and Documentation
The laboratory follows strict “matching” rules to ensure patient safety. The name and date of birth written on the sample tube must match the details on your request form exactly. If there’s a discrepancy, the lab won’t process the sample to avoid the risk of a misdiagnosis. Use a ballpoint pen to ensure the ink doesn’t smudge on the plastic label.
You must also record the exact date and time you took the sample. The transport media—the gel or liquid at the bottom of the tube—is designed to keep bacteria viable for a specific window, usually 48 to 72 hours. If the lab doesn’t know when the sample was collected, they can’t guarantee the result’s accuracy. Using an expired kit is equally risky; the media degrades over time and won’t support bacterial life, leading to false negatives.
It’s vital to disclose if you’ve used antibiotics in the last 14 days. These medications can suppress MRSA growth even if the bacteria are still present, which might mask a colonisation. For more information on how labs handle different types of diagnostic samples, you can explore our guide on Understanding Blood Tests. Following these protocols ensures that when you’re how to use a home mrsa test kit, you get the right answer the first time.
Returning Your Kit and Receiving Your Results
Completing your swabs is only half the journey; returning them correctly ensures the laboratory receives a viable sample for analysis. When you are learning how to use a home mrsa test kit, timing is the most critical factor for accuracy. You should always collect your samples on the same day you intend to post them. Samples that sit at room temperature for extended periods before entering the postal system can degrade, which might affect the reliability of a culture-based test.
Your kit includes a prepaid Royal Mail Tracked 24 envelope. This service is specifically chosen to expedite the delivery of your samples to our UKAS-accredited facility. Once you’ve sealed your samples in the provided biohazard bag and placed them in the return envelope, you can drop it into any Royal Mail postbox. However, using a designated Priority Postbox will often ensure a faster collection time and quicker arrival at the lab.
The timeline for your results depends on the type of analysis you selected:
- PCR Molecular Detection: This advanced method looks for the DNA of the bacteria. It provides results within 24 hours of the sample arriving at the lab.
- Standard MRSA Culture: This traditional method involves growing the bacteria in a controlled environment. Results typically take 48 to 72 hours.
We deliver all results through a secure, confidential email or a private online portal. This ensures your medical data remains protected and accessible only to you. You’ll receive a notification the moment your report is ready for download.
Postage and Logistics in the UK
To ensure the highest level of accuracy, you should avoid posting your kit on a Friday afternoon, Saturday, or Sunday. Weekend posting often leads to samples sitting in sorting offices for 48 hours or more, which isn’t ideal for culture samples. By posting between Monday and Thursday, you ensure the fastest possible turnaround. You can use the tracking number on your Royal Mail label to monitor your kit’s journey to our laboratory. Every test is processed in a 100% UK-based facility, maintaining strict clinical standards throughout the process.
What Do Your Results Mean?
Understanding your report is a vital part of knowing how to use a home mrsa test kit effectively. The results will indicate one of two outcomes:
- MRSA Negative: This means no colonisation was detected at the time of the swab. This result is often required by hospitals to confirm you’re safe for surgery.
- MRSA Positive: This indicates that MRSA colonisation was found on your skin or in your nostrils. It doesn’t necessarily mean you’re ill, but you may need a decolonisation wash or treatment before a hospital admission.
If you receive a positive result, it’s helpful to understand the context of Hospital-Acquired Infections and how screening helps prevent the spread of bacteria in clinical settings. Finding out you’re a carrier allows you to take simple steps to clear the bacteria before it becomes a risk to yourself or others.
Take control of your health and prepare for your upcoming procedure with confidence. Order your discreet MRSA home test kit today for fast, reliable results.
Why Choose mrsatest.co.uk for Your Pre-Surgery Screening?
Preparing for an operation is stressful enough without the added worry of hospital-acquired infections. While the NHS provides screening, waiting times for results often take 72 hours or longer, which can clash with tight surgical schedules. We offer a professional-grade alternative that bypasses these delays. By choosing our service, you’re accessing the same high-standard diagnostics used by major private hospitals across the UK.
Our kits aren’t basic consumer products. They’re clinical tools processed by UKAS-accredited laboratories. This ensures your results are accurate, reliable, and meet the standards required by surgical teams. Once you’ve learned how to use a home mrsa test kit, you can send your samples back with confidence. We prioritize your privacy through discreet packaging. No medical branding is visible on the outside of the box. Your health information stays between you and the lab.
Expert support is a core part of our service. Our team helps you interpret your findings, ensuring you stay on track for your surgery date. If your result is positive for colonisation, we provide the clarity needed to discuss decolonisation treatment with your GP or surgeon immediately. This proactive approach helps prevent last-minute cancellations, which affect approximately 1 in 10 elective surgeries in the UK due to various health or administrative factors.
The Convenience of At-Home Testing
You don’t need to spend time in a GP waiting room or travel to a clinic while trying to manage your pre-surgical admin. You can simply order your confidential MRSA test kit online and have it delivered directly to your door. This flexibility is vital when you’re managing a complex pre-op health checklist and need to tick off requirements quickly.
Our service integrates seamlessly into your preparation routine. Understanding how to use a home mrsa test kit takes only a few minutes, yet it provides 100% UK-based support throughout the process. We use rapid PCR technology that can detect MRSA DNA in as little as 24 hours after the lab receives your swab. This speed is a significant advantage over traditional culture methods, which often require 48 to 72 hours for incubation. Testing from the comfort of your own home means one less appointment to juggle. It gives you more time to focus on your recovery and well-being.
Take Control of Your Pre-Surgery Health Today
Learning how to use a home mrsa test kit gives you the power to manage your healthcare on your own terms. It’s about more than just convenience; it’s about ensuring your surgical path remains clear and safe. By following our clinical swabbing guide, you’ve taken the first step toward a successful screening process without the need for a hospital visit.
Our service relies on a UKAS-accredited partner laboratory to deliver results you can trust. We offer a rapid 24-hour PCR testing option because we know that pre-surgery timelines are often tight. Everything we do is 100% UK-based and confidential, so you don’t have to worry about your privacy while you prepare for your procedure. It’s a simple, professional solution designed for your peace of mind and clinical safety.
Order Your Professional MRSA Home Test Kit Today
You’ve got this handled, and we’re ready to help you get the answers you need quickly and discreetly.
Frequently Asked Questions
Can I eat or drink before taking an MRSA swab?
Yes, you can eat and drink normally before using your kit. Unlike some blood tests, an MRSA screen isn’t affected by food or liquid intake because the bacteria live on the skin and mucosal surfaces. You’ll usually swab your nostrils, throat, and groin area. Just ensure you haven’t used antiseptic mouthwash or nasal sprays within 6 hours of testing, as these products can interfere with the sample’s accuracy.
How long are MRSA test results valid for surgery in the UK?
Most NHS trusts and private hospitals in the UK consider MRSA results valid for 30 days before your scheduled procedure. If your operation is delayed beyond this 1-month window, you’ll likely need a repeat screen to ensure safety. Some high-risk surgeries, such as heart or brain operations, might require a fresh test within 48 hours of admission. Always check your specific hospital’s pre-operative assessment guidelines to confirm their requirements.
What happens if I test positive for MRSA before my operation?
If you test positive, your surgery won’t necessarily be cancelled, but it might be postponed while you undergo decolonisation. This typically involves a 5-day course of antiseptic body wash and antibiotic nasal cream. Public Health England data shows that around 3% of the population carries MRSA without symptoms. Completing this treatment reduces the risk of post-surgical infection by approximately 60%, ensuring a safer environment for your recovery and for other patients.
Is the home MRSA test kit as accurate as a hospital test?
Yes, our kits provide the same level of clinical accuracy as those used in a hospital setting. When you learn how to use a home mrsa test kit correctly, the sample quality remains high for laboratory analysis. We process all samples in UKAS-accredited facilities using PCR or culture methods. These labs follow the same ISO 15189 standards as NHS pathology departments, ensuring 99% reliability in detecting MRSA colonisation from your swabs.
Do I need to swab my throat for an MRSA screen?
Yes, swabbing the throat is a standard part of a comprehensive MRSA screen in the UK. The bacteria often colonise the tonsils and the back of the throat even if they aren’t present in the nose. To get an accurate result, you should rub the swab firmly over your tonsils or the area where they used to be. Including a throat swab increases the detection rate of MRSA carriage by roughly 25% compared to nasal swabbing alone.
What should I do if the swab snaps before I’ve finished?
If a swab snaps or becomes contaminated by touching a surface like the floor, you shouldn’t use it. A broken swab can lead to an insufficient sample or potential injury during collection. It’s vital to follow the instructions on how to use a home mrsa test kit carefully to avoid applying excessive pressure. Contact our support team immediately, and we’ll ensure a new, sterile swab is dispatched to your UK address via first-class post.
How long does it take to get MRSA test results back?
You’ll typically receive your results within 24 to 72 hours of the lab receiving your sample. An MRSA PCR rapid test can provide molecular detection in just 24 hours, while a traditional culture test may take up to 3 days to confirm bacterial growth. We provide these results via a secure online portal or encrypted email. This fast turnaround allows you to meet tight pre-operative deadlines without the stress of long waiting periods.
Can I use the kit if I have a cold or runny nose?
You can still perform the test if you have a cold, but you must ensure the swab collects skin cells from the nasal lining rather than just mucus. Gently blow your nose before starting to clear excess secretions. A runny nose doesn’t change the presence of MRSA, but heavy mucus can sometimes dilute the sample. If you have a high fever, it’s often best to wait 48 hours until it subsides before testing.